This post is proudly sponsored by Code & Co.
Disclaimer: I’m not affiliated to fly.io at all, this is just a personal account of my experience with it.
Fly.io 101
Even though fly is pretty much “Phoenix First” these days (they hired Chris McCord for a reason!), it’s still a very decent way to deploy a Reactive Rails app, as Matt Yorkley has demonstrated here. Let’s go through a quick list of preliminary information before we get started.
Docker or Buildpacks?
A lot of Rails developers considering Fly as a Platform as a Service these days are accustomed to the Heroku way of deploying apps via git push and Cloud Native Buildpacks that manage the deployment process automatically. While Fly defaults to a Dockerfile builder - and indeed, the Rails setup wizard will generate one for you, as we shall see - you can also use a buildpack builder by specifying a builder and buildpacks in the fly.toml configuration:
[build]
  builder = "heroku/buildpacks:18"
  buildpacks = ["...", "..."]
Also refer to this blog post to select the correct builder (at the moment of writing this would be heroku/buildpacks:18)
Free Allowances
While Fly has a quite generous stack of free allowances which will let you start and maintain a reasonably sized side-project for free, I would like to specifically point out their free postgres offering, which largely builds on the allowed 3GB of volume storage. Here are a few examples for how to configure it. Bear in mind though that the free compute allowance is summed together for all apps - if you exceed that, you might not be able to keep your whole Rails project free.
Getting Started
- The first thing you’ll want to do, is to install the
flyctlCLI (see here) - Next, quite obviously, you need to create a Fly account. Run
flyctl auth signup, which will in turn open the browser for you. Note that you will have to provide credit card information upfront, because ”here’s what happens if you give people freemium full access to a hosting platform: lots and lots of free VMs mining for cryptocurrencies.” Fair enough from my vantage point. - Run
flyctl auth loginto authenticate against Fly.
Now you’re all set up to deploy your first app.
Setup Wizard
For the remainder of this walkthrough, let’s assume you have a simple Rails app called my-app, and your terminal’s working directory is pointing to the root folder of this app.
I’ll start this by a rundown of the official Rails Getting Started tutorial, before I dive into a little more advanced topics.
The setup wizard for Rails apps is suprisingly helpful. If you run fly launch it will:
- Detect a Rails app
- Ask you to specify your organization and primary region
- Produce a
fly.tomlfile, which we will look at later - Ask whether you would like to set up a Postgresql database right now. If you do that, it will save you the effort of creating and attaching to it manually. This is eminently helpful because it sets up the
DATABASE_URLvia an application secret right away. - It then rattles through the process of preparing your app for deployment. Notice that it is not yet deployed at this stage!
Below is a sample output of that command:
$ fly launch
Creating app in /.....
Scanning source code
Detected a Rails app
? App Name (leave blank to use an auto-generated name): my-app

? Select organization:  Julian Rubisch (personal)
? Select region:  fra

Created app my-app in organization personal
Wrote config file fly.toml
? Would you like to setup a Postgresql database now? y

? Select configuration:  [Use arrows to move, type to filter]
> Development - Single node, 1x shared CPU, 256MB RAM, 1GB disk
  Production - Highly available, 1x shared CPU, 256MB RAM, 10GB disk
  Production - Highly available, 1x Dedicated CPU, 2GB RAM, 50GB disk
  Production - Highly available, 2x Dedicated CPUs, 4GB RAM, 100GB disk

Creating postgres cluster my-app-db in organization personal
[...]

Postgres cluster my-app-db is now attached to my-app
The following secret was added to my-app:
  DATABASE_URL=postgres://xxxxxxx:xxxxxxx@top2.nearest.of.my-app-db.internal:5432/my-app
Postgres cluster my-app-db is now attached to my-app

Your Rails app is prepared for deployment. Production will be setup with these versions of core runtime packages:

Ruby 3.0.0
Bundler 2.2.5
NodeJS 14
Postgres cluster my-app-db is now attached to my-app
The following secret was added to my-app:
  DATABASE_URL=postgres://xxxxxxx:xxxxxxx@top2.nearest.of.my-app-db.internal:5432/my-app
Postgres cluster my-app-db is now attached to my-app

Your Rails app is prepared for deployment. Production will be setup with these versions of core runtime packages:

Ruby 3.0.0
Bundler 2.2.5
NodeJS 14

[...]

run 'fly deploy --remote-only'
The fly.toml configuration file created for you by the CLI looks like this:
# fly.toml file generated for my-app on 2022-06-06T13:44:47+02:00

app = "my-app"

kill_signal = "SIGINT"
kill_timeout = 5
processes = []

[build]

  [build.args]
    BUNDLER_VERSION = "2.2.5"
    NODE_VERSION = "14"
    RUBY_VERSION = "3.0.0"

[deploy]
  release_command = "bundle exec rails db:migrate"

[env]
  PORT = "8080"
  SERVER_COMMAND = "bundle exec puma -C config/puma.rb"

[experimental]
  allowed_public_ports = []
  auto_rollback = true

[[services]]
  http_checks = []
  internal_port = 8080
  processes = ["app"]
  protocol = "tcp"
  script_checks = []

  [services.concurrency]
    hard_limit = 25
    soft_limit = 20
    type = "connections"

  [[services.ports]]
    force_https = true
    handlers = ["http"]
    port = 80

  [[services.ports]]
    handlers = ["tls", "http"]
    port = 443

  [[services.tcp_checks]]
    grace_period = "1s"
    interval = "15s"
    restart_limit = 0
    timeout = "2s"

[[statics]]
  guest_path = "/app/public"
  url_prefix = "/"
Observe that it has
- acquired
BUNDLER_VERSION,NODE_VERSIONandRUBY_VERSIONfrom your app - set the
SERVER_COMMANDto a puma startup command - added a
release_commandthat will run your migrations, as you are probably used to if you are a Heroku user.
Furthermore, a Dockerfile should have been created for your perusal, or, more specifically, for Fly to use for deployment. I won’t reproduce a listing of this file here (you can easily take a look at it yourself if you follow the steps above), but point out some interesting details:
- It uses a Fullstaq Ruby image with jemalloc enabled. You can read in its FAQ why that is a good thing to have turned on by default
- It uses volta.sh to install node and yarn
- It then uses multi-stage Docker builds to install OS packages, gems, and node packages separately
- Finally, it will copy your app directory and run
rails assets:precompilefor you.
A short aside: At this point, I usually like to create a fly directory which will hold all the configuration files for Fly (because there will be more!):
$ mkdir fly
$ mv fly.toml fly
Deploy
Now we’re ready to deploy our app! Let’s pause for a moment, though, and import the RAILS_MASTER_KEY to the Fly app’s secrets (assuming you’re on Rails >= 6.1):
$ fly secrets set RAILS_MASTER_KEY=$(cat config/master.key) -c fly/fly.toml
The deploy itself is then only a matter of running
$ fly deploy --remote-only -c fly/fly.toml
Note: the --remote-only option tells Fly to use a remote builder (which are free) other than your local Docker installation - which especially useful if you, like me, are working on an Apple Silicon/ARM64 based computer which might lead to issues.
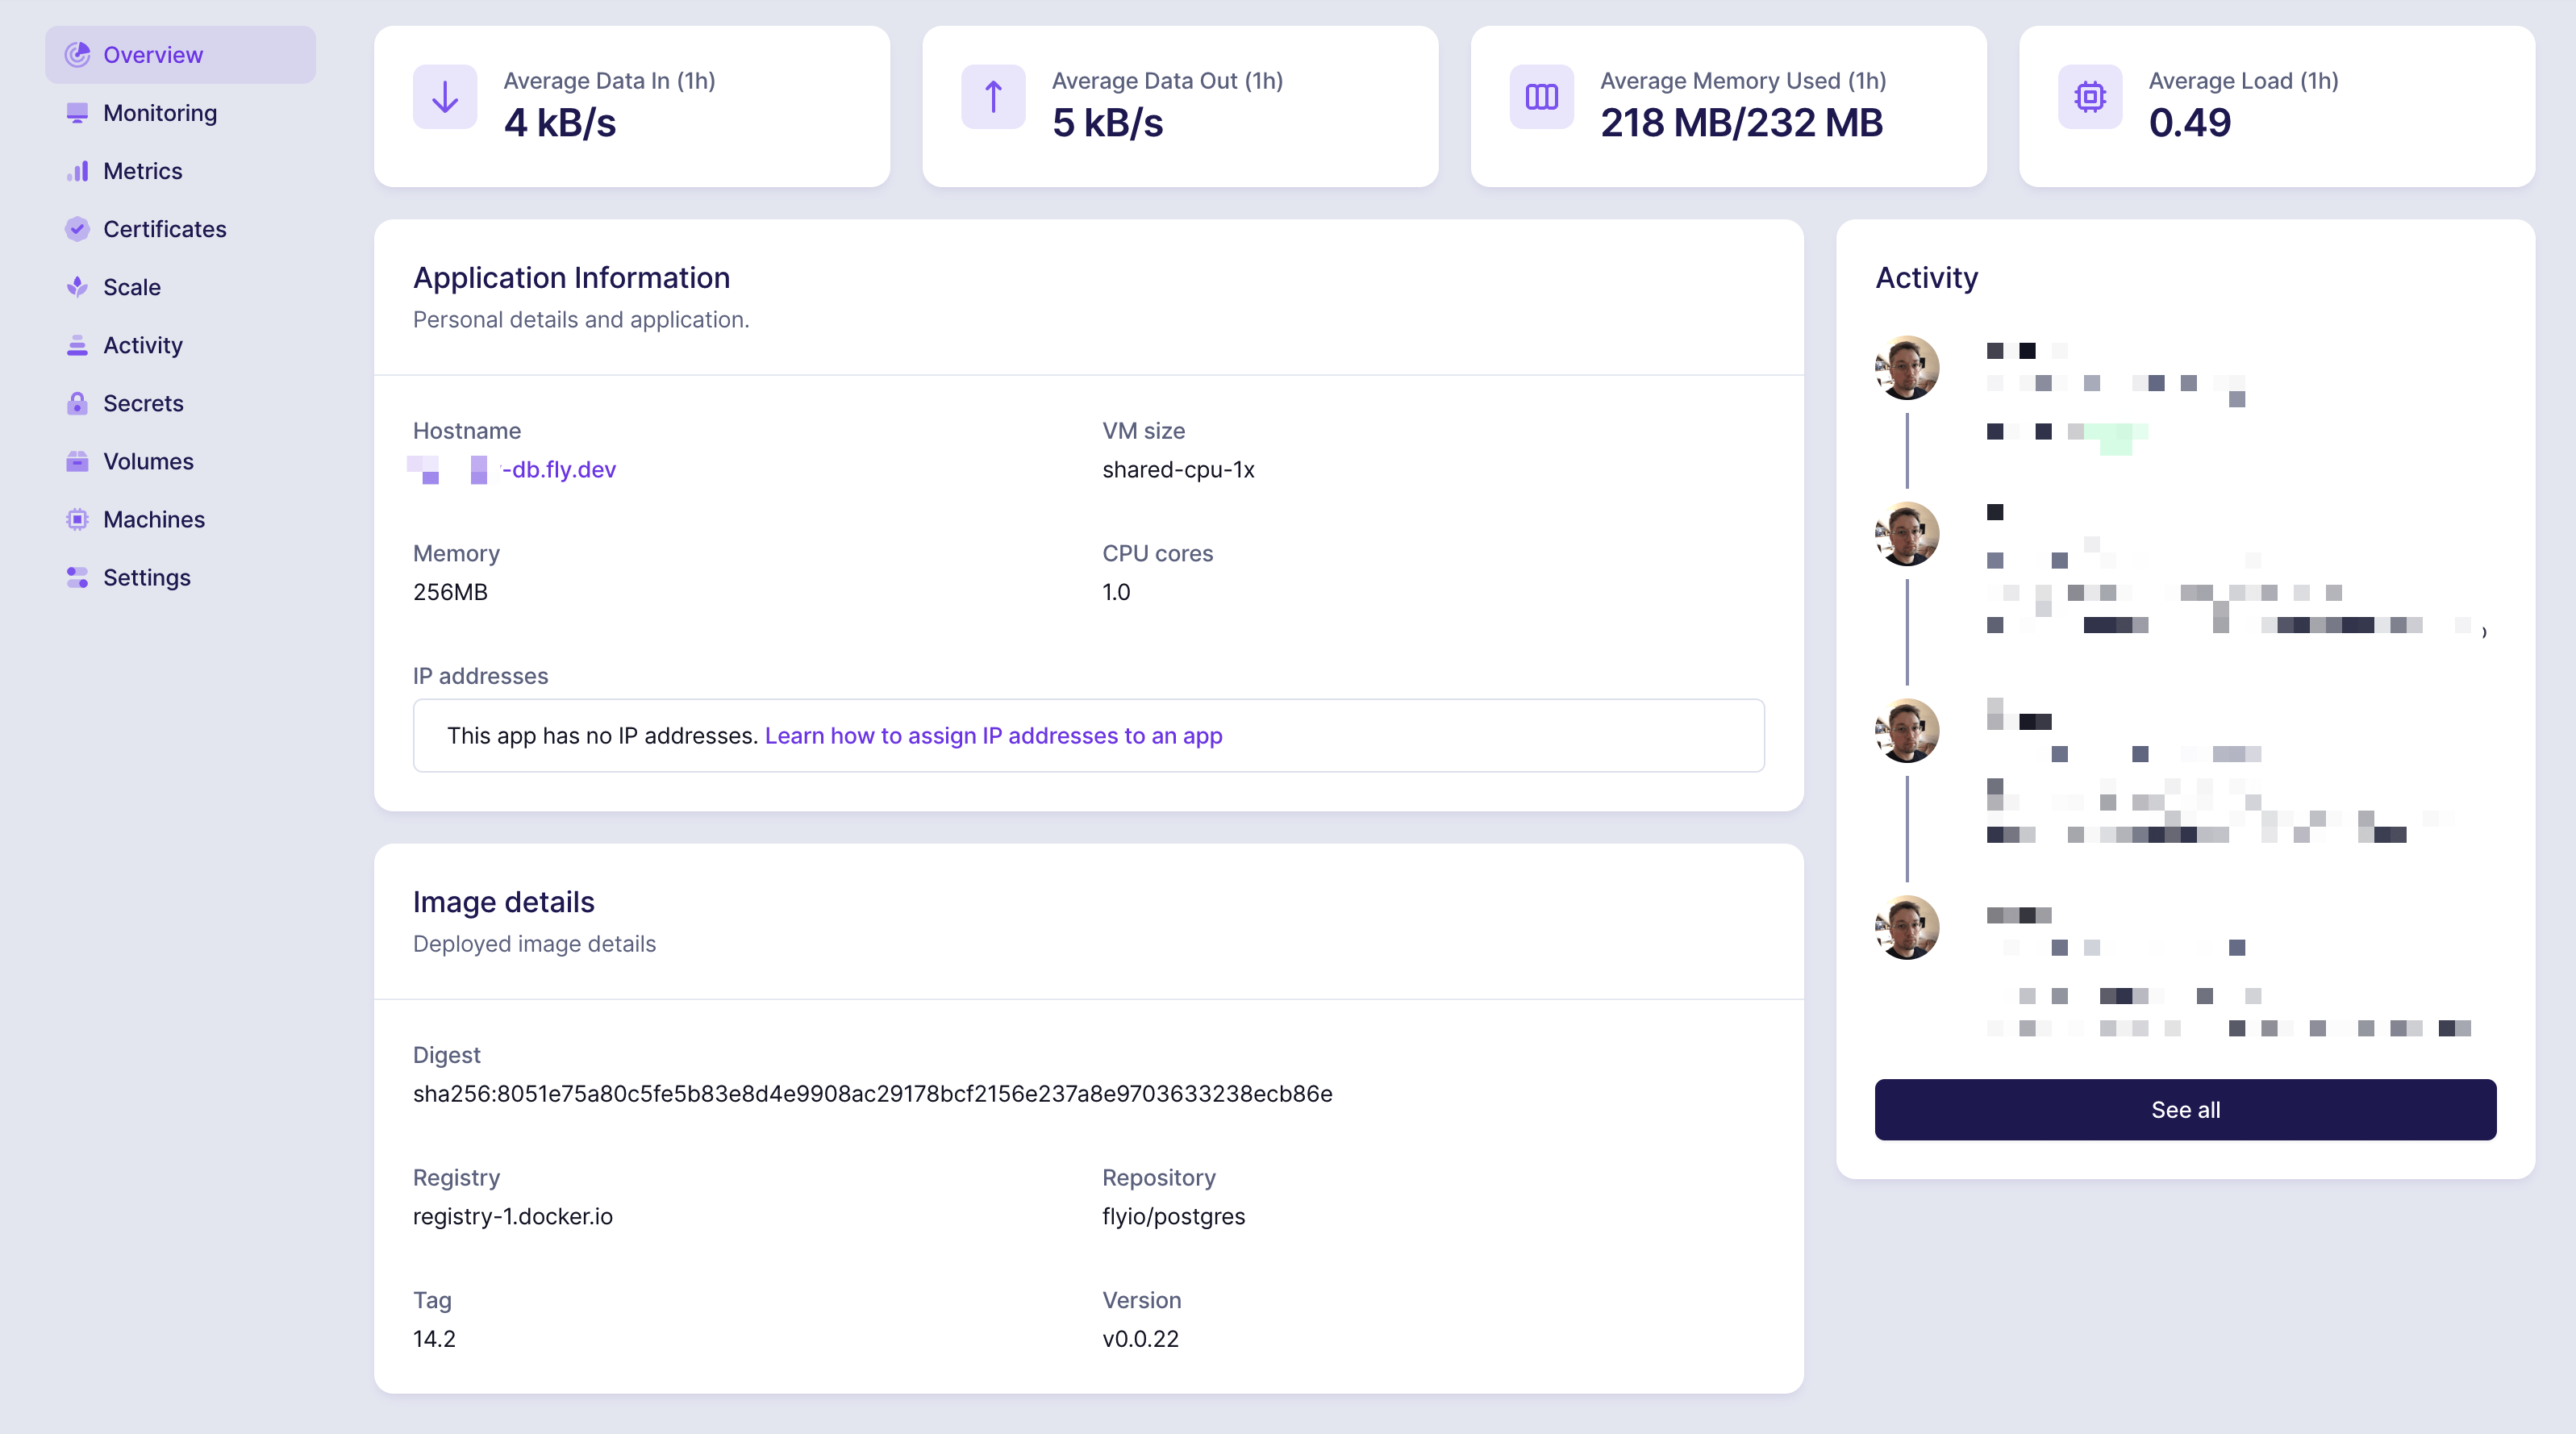
Assuming this command completed without errors, you should be able to inspect your app in the Fly dashboard:
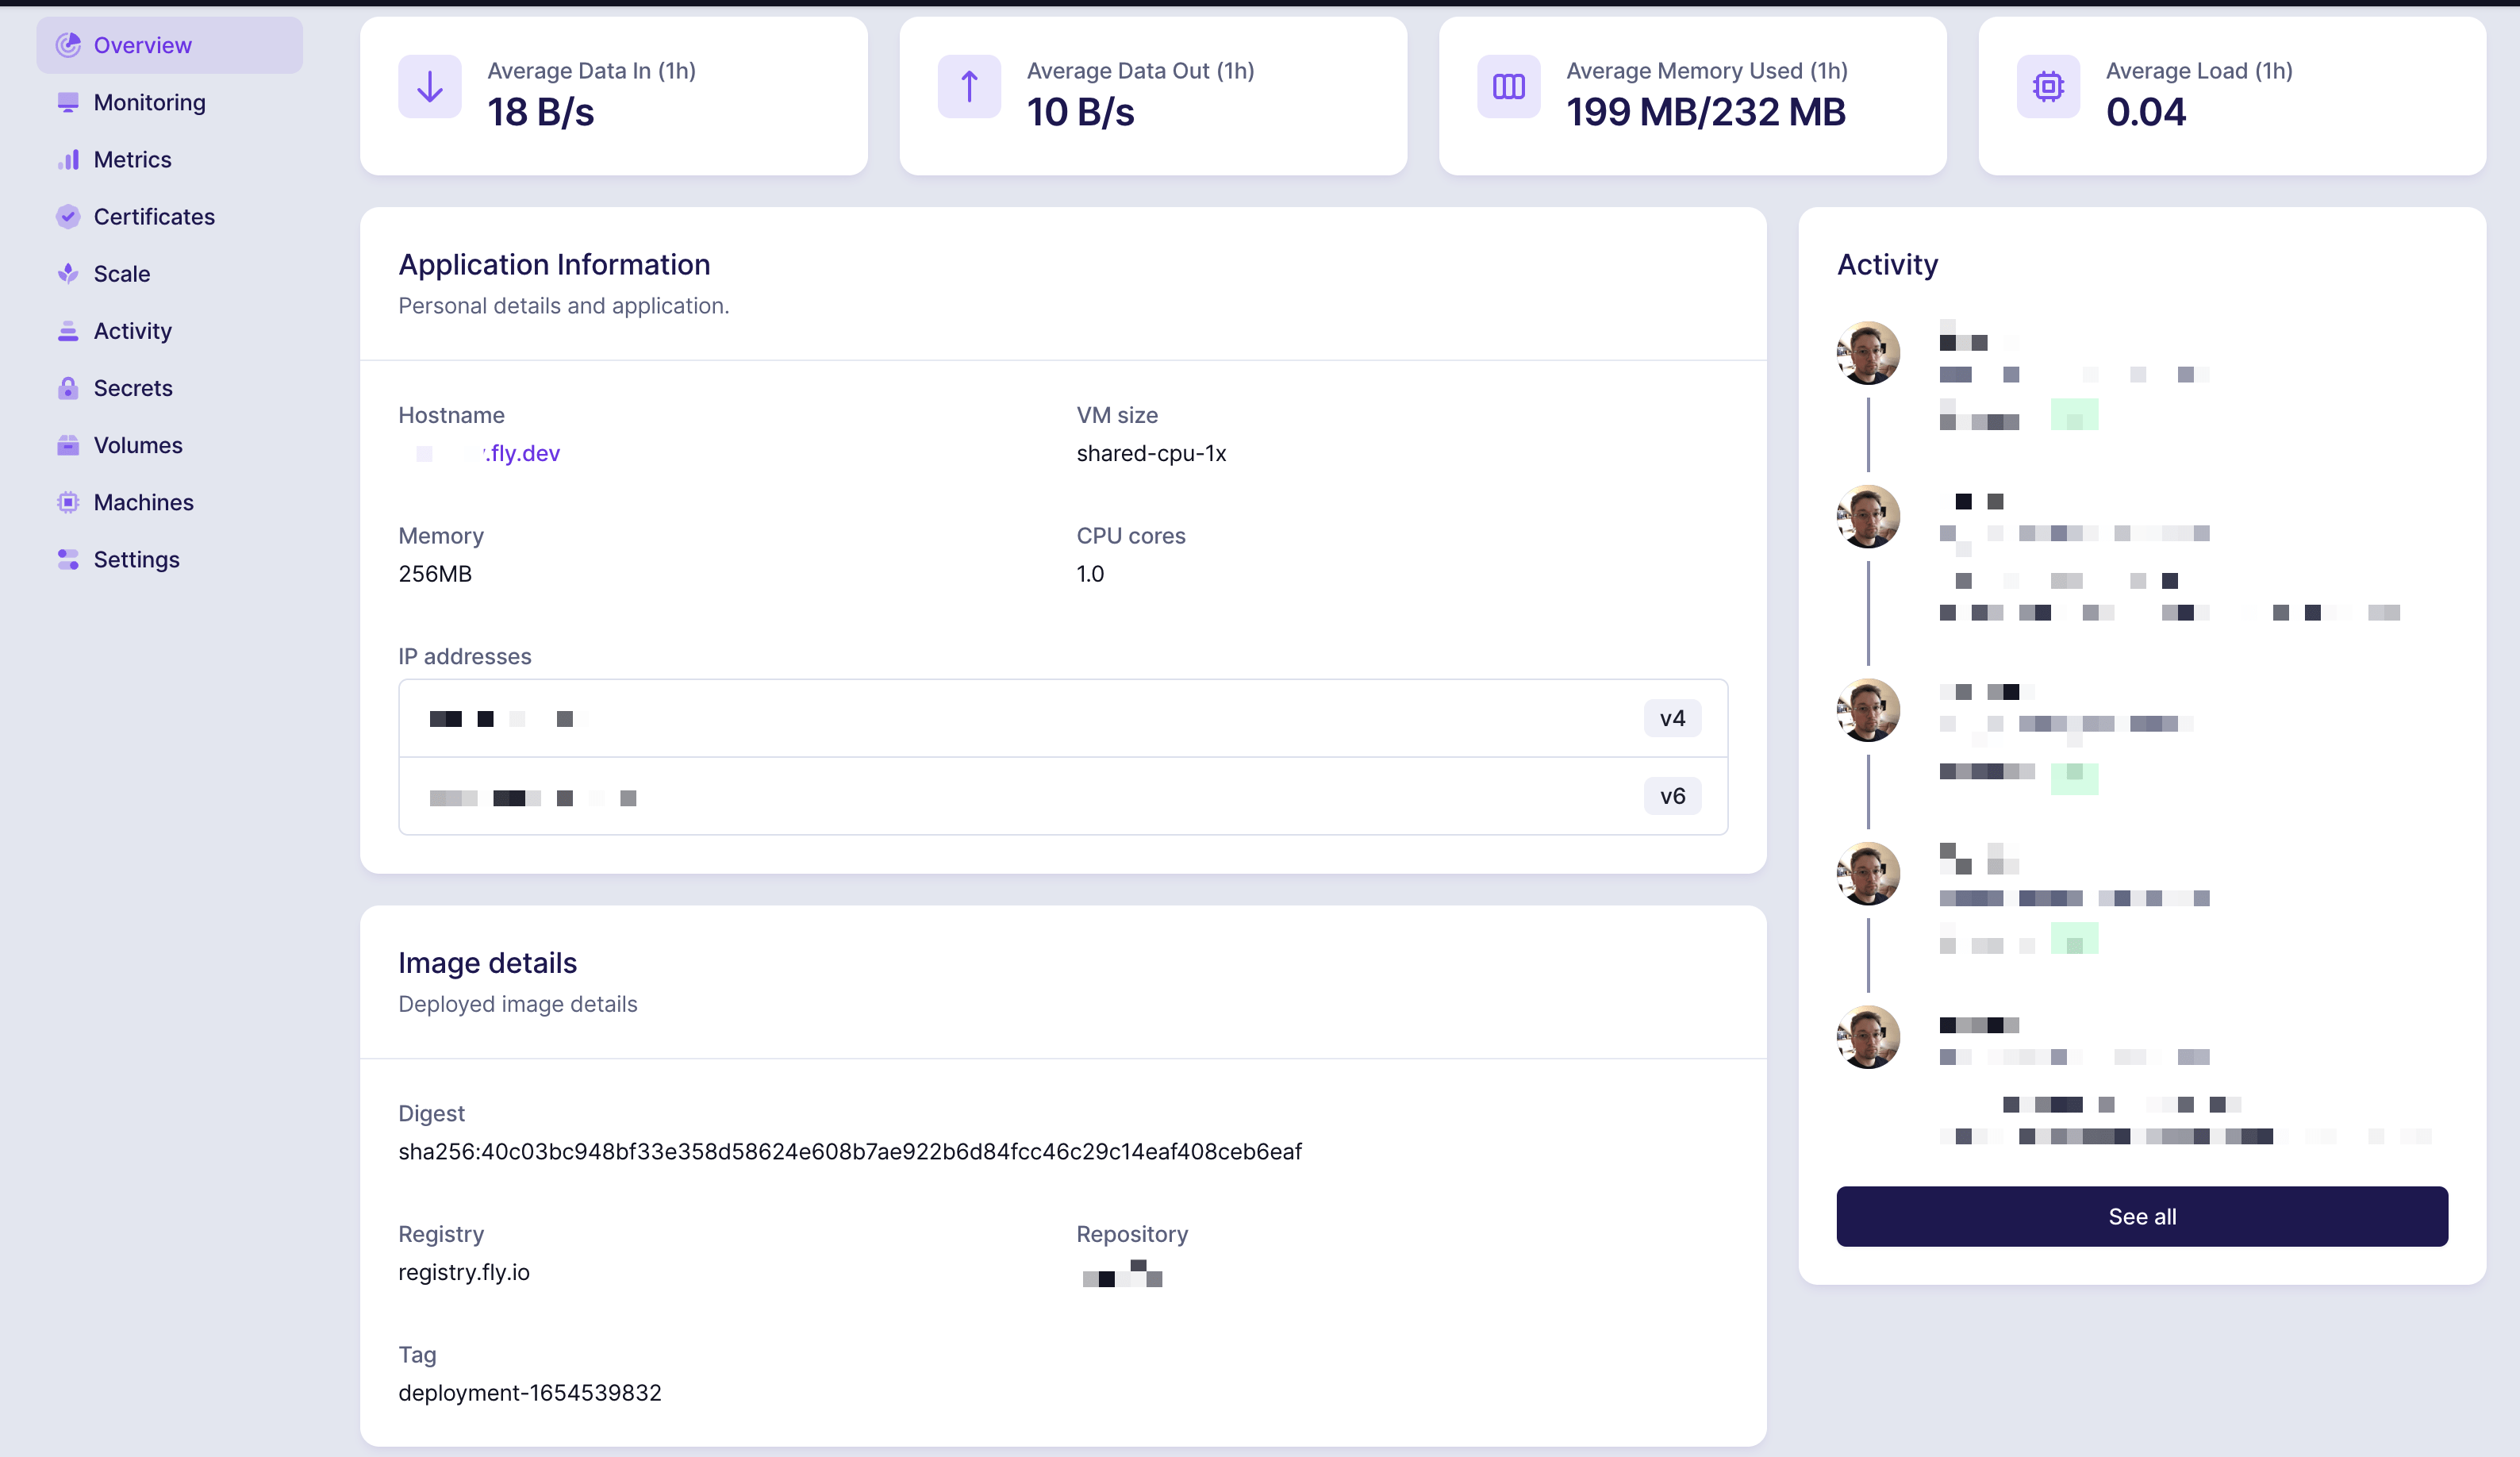
Along with the accompanying, separate database app:
Redis
Chances are, since we are talking about reactive Rails applications, you will need a key/value store like Redis for ActionCable, Sidekiq, Fragment Caching, and other usual suspects.
Now, even though there is a blog post about how to achieve globally distributed Redis by the fly founder, Kurt Mackey, I’d like you to hold your breath for a second. There is another option that fits our bill even better: KeyDB, which was recently acquired by Snap.
From the project’s README:
KeyDB is a high performance fork of Redis with a focus on multithreading, memory efficiency, and high throughput.
Quite precognitive, the Fly crew has put together a KeyDB sample app for our usage at https://github.com/fly-apps/keydb/. One of the taglines is:
KeyDB also supports a multimaster mode which is uniquely suited to deployment on Fly.
Beware though that this doesn’t enforce strong consistency, which isn’t an issue for most use cases, but you might consider using traditional Redis for your ActiveJob processor (we’ll come back to that later).
KeyDB Walkthrough
The process starts with cloning said Github repository to your app. I always do this in a fly/keydb folder, as a git submodule, like so:
$ mkdir fly/keydb-cache
$ git clone https://github.com/fly-apps/keydb.git fly/keydb-cache
$ cd fly/keydb-cache
Before you proceed, crack open fly/keydb-cache/fly.toml in your editor and rename it to reflect your main app’s name. Note that I also labelled it “cache” to discern it from future additional instances.
app = "my-app-keydb-cache"

[mount]
  destination = "/data"
  source = "keydb_server"
$ fly launch

An existing fly.toml file was found for app keydb-multimaster-example
? Would you like to copy its configuration to the new app? Yes
Creating app in /Users/jrubisch/.../my-app/fly/keydb-cache
Scanning source code
Detected a Dockerfile app
? App Name (leave blank to use an auto-generated name): my-app-keydb
? Select organization: Julian Rubisch (personal)
? Select region: fra (Frankfurt, Germany)
Created app my-app-keydb in organization personal
Wrote config file fly.toml
? Would you like to setup a Postgresql database now? No
? Would you like to deploy now? No
Your app is ready. Deploy with `flyctl deploy`
This sets up our app for deployment, but we pause here for a second to prepare a few things, namely authentication of our KeyDB app, and persistent storage.
The standard configuration requires us to set a KEYDB_PASSWORD; afterwards we create a volume called keydb_server (as was referred to in the above config file) in every region we’d like to deploy and synchronize this KeyDB app. Note that I’ve restricted the size to 1GB in this example, since that is enough for a side project or staging configuration - you might want to increase this according to your app’s requirements. Finally, we deploy.
$ fly secrets set KEYDB_PASSWORD=password

$ fly volumes create keydb_server --size 1 --region fra
$ fly volumes create keydb_server --size 1 --region ... # repeat for every region

$ fly deploy
Here’s an important takeaway: By default, fly uses volumes to control region placement, so an app will be spun up for every region where you deployed a volume. You’ll later want to deploy an instance of your main app to every region with a KeyDB instance, but we’ll cover that later.
Advanced KeyDB Config
If your app runs for a while, chances are your KeyDB instance will fill up with data. Luckily for us, KeyDB supports standard Redis configuration options (refer here for a full listing). From those, maxmemory and maxmemory-policy are the most important ones, which I’ve appended to the default config (to be found at fly/keydb-cache/keydb.conf).
dir /data/
protected-mode no
appendonly no

# snapshotting
save 900 1
save 300 10
save 60 10000

# replication
active-replica yes
multi-master yes
replica-serve-stale-data no

# add these:
maxmemory 100mb                # scale at your own leisure
maxmemory-policy allkeys-lru   # or try allkeys-lfu
Note that LRU stands for “Least Recently Used” while LFU means “Least Frequently Used”. When you’ve added your configuration options, just deploy again. If you’d like to take a look at a KeyDB-with-Rails app example, here’s one using AnyCable: https://github.com/superfly/anycable-rails.
Multiple Instances
Depending on your app’s architecture and size, you may want to deploy more than one KeyDB instance (e.g. one for ActionCable, one for the Rails cache, one for kredis, maybe even one for session storage, etc.) To achieve that, start over and clone a new version of the original KeyDB repo, to, for example, fly/keydb-cable etc. Below we’ll talk about how to adapt your configurations accordingly.
Regionalized App Configurations
Finally, Fly.io’s USP are globally distributed operations, and we want to capitalize on that, of course. Luckily, Fly’s VM configuration makes it easy for us to do exactly that.
Fly’s internal private networking uses region qualifiers that are exposed to your app as the FLY_REGION environment variable. Thus we can refer to the KeyDB instance(s) pertaining to the region where our Rails app is deployed like so:
config/cable.yml
# ...
production:
  adapter: redis
  url: <%= "redis://#{ENV['FLY_REGION']}.#{ENV['REDIS_CABLE_HOST']}/1" %>
  password: <%= ENV.fetch("REDIS_CABLE_PASSWORD", "password") %>
  channel_prefix: my_app_production
- Cache configuration, in your environment config file (e.g.
config/production.rb)
# ...

config.cache_store = :redis_cache_store, {
  url: "redis://#{ENV["FLY_REGION"]}.#{ENV["REDIS_CACHE_HOST"]}/1",
  password: ENV["REDIS_CACHE_PASSWORD"]
}

# ...
- Kredis configuration,
config/redis/shared.yml
# ...

production: &production
  url: <%= "redis://#{ENV['FLY_REGION']}.#{ENV['REDIS_KREDIS_HOST']}/0" %>
  password: <%= ENV["REDIS_KREDIS_PASSWORD"] %>
  timeout: 1
etc.
Note that I used different HOST and PASSWORD environment variables for each KeyDB instance. Before we can deploy our main Rails app again, we must set them as Fly secrets:
In your app’s root directory do:
$ fly secrets set REDIS_CABLE_PASSWORD=password -c fly/fly.toml
$ fly secrets set REDIS_CABLE_HOST=my-app-keydb-cable.internal:6379 -c fly/fly.toml

$ fly secrets set REDIS_CACHE_PASSWORD=password -c fly/fly.toml
$ fly secrets set REDIS_CACHE_HOST=my-app-keydb-cache.internal:6379 -c fly/fly.toml

$ fly secrets set REDIS_KREDIS_PASSWORD=password -c fly/fly.toml
$ fly secrets set REDIS_KREDIS_HOST=my-app-keydb-kredis.internal:6379 -c fly/fly.toml
After that, we are ready to fly deploy -c fly/fly.toml again.
Background Workers
Before we start our exploration of how to set up worker nodes for job processors like ActiveJob, Sidekiq etc., we need to consider a preliminary question:
Do we want to run both app server (i.e. puma) and worker processes inside the same app/instance or in separate ones?
In other words, do we favor the Heroku approach (one “dyno” per workload), or do we want to leverage Fly’s multi-process support? There’s pros and cons to each approach, let’s quickly consider them:
| Multi-Process App | Separate Apps | |
|---|---|---|
| Setup | Run Procfile with e.g. Overmind | Deploy separate apps with separate fly configs |
| Deployment | simple | (fairly) complex |
| Scaling | need to scale both workloads together | can scale both workloads independently |
| Cost | low for small projects running only a single (or a few) VM, can get costly if you need to scale up the job workers | high initially (2 VMs minimum), can pay off if you need a lot of worker nodes |
You will have to make the decision for yourself, but the more flexible one, in my opinion is to run them as separate Fly apps. Additionally, multi-processes are still currently a preview feature as detailed out in this blog post. We are going to run with the multi-app option for the moment, so let’s just clone our fly.toml to a separate fly.worker.toml:
$ cp fly/fly.toml fly/fly.worker.toml
$ fly launch --name my-app-worker --no-deploy
Creating app in /Users/jrubisch/Documents/_CODE/saas/my-app
Scanning source code
Detected a Dockerfile app
Selected App Name: my-app-worker
? Select organization: Julian Rubisch (personal)
? Select region: fra (Frankfurt, Germany)
Created app my-app-worker in organization personal
Wrote config file fly.toml
? Would you like to setup a Postgresql database now? No
? Would you like to deploy now? No
Your app is ready. Deploy with `flyctl deploy`
Be careful though to remove the migration release command to avoid race conditions. Also, change the SERVER_COMMAND to your job processor (Sidekiq in the example blow) accordingly, and delete any services (since a worker node shouldn’t expose any port to the public).
app = "my-app-worker"

kill_signal = "SIGINT"
kill_timeout = 5
processes = []

[build]

  [build.args]
    BUNDLER_VERSION = "2.2.5"
    NODE_VERSION = "14"
    RUBY_VERSION = "3.0.0"

# remove this 👇🏻
# [deploy]
#   release_command = "bundle exec rails db:migrate"

[env]
  # change this 👇🏻
  SERVER_COMMAND = "bundle exec sidekiq -C config/sidekiq.yml"

[experimental]
  allowed_public_ports = []
  auto_rollback = true

# a worker node doesn't expose any services
# [[services]]
# deleted 🚮
Worker Redis
I mentioned above that there’s some nuance to how to deal with Redis in the context of workers. While for a side project you might be fine with deploying another (or the same) KeyDB instance, for production scenarios you’ll want to err on the safe side and use a vanilla Redis instance with all the consistency guarantees that multi-master KeyDB does not offer. Also, chances are you don’t actually want to send data for your workers around the globe, so a single Redis instance per region, holding the ActiveJob/Sidekiq serialization data is not only good enough, but probably exactly what we are looking for.
For this, I usually just fall back to the Redis on Fly reference, i.e. create a fly app using fly launch and configure as you go, or just create a separate config file at fly/fly.redis.toml:
app = "my-app-worker-redis"

kill_signal = "SIGINT"
kill_timeout = 5
processes = []

[build]
  image = "flyio/redis:6.2.6"

[env]
  MAXMEMORY_POLICY = "noeviction"

[experimental]
  allowed_public_ports = []
  auto_rollback = true

[metrics]
  port = 9091
  path = "/metrics"

[[mounts]]
  destination = "/data"
  source = "redis_server"
Note that MAXMEMORY_POLICY can be set as an environment variable as per the docs. In the case of your job processor backend, you want this to be noeviction, because you decidedly want it to fail loudly before any jobs are silently dropped.
We then go through the fly launch, fly deploy cycle again:
$ fly launch --name my-app-worker-redis --no-deploy
$ fly secrets set REDIS_WORKER_PASSWORD=super-secret-password -c fly/fly.redis.toml
$ fly volumes create redis_server --size 1 --region fra
Using the example of Sidekiq, you need to specify both the Redis URL and password in the same manner as we did above, for both client and server:
if Rails.env.production?
  Sidekiq.configure_server do |config|
    config.redis = {
      url: "redis://#{ENV['FLY_REGION']}.#{ENV['REDIS_WORKER_HOST']}/1",
      password: ENV["REDIS_WORKER_PASSWORD"]
    }
  end

  Sidekiq.configure_client do |config|
    config.redis = {
      url: "redis://#{ENV['FLY_REGION']}.#{ENV['REDIS_WORKER_HOST']}/1",
      password: ENV["REDIS_WORKER_PASSWORD"]
    }
  end
end
We must set those environment variables both in our app and worker images to enable communication between them:
$ fly secrets set REDIS_WORKER_PASSWORD=password -c fly/fly.toml
$ fly secrets set REDIS_WORKER_HOST=my-app-worker-redis.internal:6379 -c fly/fly.toml

$ fly secrets set REDIS_WORKER_PASSWORD=password -c fly/fly.worker.toml
$ fly secrets set REDIS_WORKER_HOST=my-app-worker-redis.internal:6379 -c fly/fly.worker.toml
Finally, do not forget to add your master key to the worker’s secrets. Then we are ready to deploy:
$ fly secrets set RAILS_MASTER_KEY=$(cat config/master.key) -c fly/fly.worker.toml
$ fly deploy -c fly/fly.worker.toml --remote-only
Remember to deploy both Redis and worker apps in all regions that are relevant for you!
Environments
Chances are, when you are working on any non-trivial app, you want (at least) separate staging and production environments. Well, this is the point where I must admit that there’s no Heroku CI pipelines equivalent at Fly (and the way I understand their product, this also seems vastly out of scope).
The way I usually go about this is to just duplicate the relevant configuration files in the fly directory. Building on the example app above, I’ll end up with
$ ls -l fly
-rwxr-xr-x   1  entrypoint.sh
-rw-r--r--   1  fly.redis.production.toml
-rw-r--r--   1  fly.redis.staging.toml
-rw-r--r--   1  fly.web.production.toml
-rw-r--r--   1  fly.web.staging.toml
-rw-r--r--   1  fly.worker.production.toml
-rw-r--r--   1  fly.worker.staging.toml
drwxr-xr-x  12  keydb-staging-cable
drwxr-xr-x  12  keydb-production-cable
drwxr-xr-x  12  keydb-staging-cache
drwxr-xr-x  12  keydb-production-cache
drwxr-xr-x  12  keydb-staging-kredis
drwxr-xr-x  12  keydb-production-kredis
There are probably some nifty ways to compose TOML files (alike, for example, YAML) to decrease the duplication here, but frankly I haven’t looked those up yet. I might follow this up with more information whenever I’ve got the leisure to do so and/or it hurts bad enough 😜.
Deploy Pipeline with Github Actions
The last piece in the puzzle is how to get this workflow up and running with actual CI/CD. There is actually a pretty good write-up here, but I’ll quickly walk you through the according YAML configuration file (at .github/workflows/release.yml) nonetheless.
For simplicity, I’ve combined both actions for releasing staging and production builds in one file. I employ a simple switch using if: ${{ github.ref_name == 'staging' }} to filter which steps to use, but note that you could also just put them into two separate workflow YAML files.
The only preparative step you have to take is to add the FLY_API_TOKEN (obtained with fly auth token) to your Github repository’s secrets. We then employ the official flyctl Github action to run the deploy scripts like we did from the command line - and that’s it!
name: Release

on:
  push:
    branches:
      - staging
      - master

env:
  FLY_API_TOKEN: ${{ secrets.FLY_API_TOKEN }}

jobs:
  deploy:
    name: Deploy app
    runs-on: ubuntu-latest
    steps:
      - uses: actions/checkout@v3
      - uses: superfly/flyctl-actions@1.3
        if: ${{ github.ref_name == 'staging' }}
        with:
          args: "deploy -c fly/fly.worker.staging.toml"
      - uses: superfly/flyctl-actions@1.3
        if: ${{ github.ref_name == 'staging' }}
        with:
          args: "deploy -c fly/fly.web.staging.toml"
      # cheap staging/production switch
      - uses: superfly/flyctl-actions@1.3
        if: ${{ github.ref_name == 'master' }}
        with:
          args: "deploy -c fly/fly.worker.production.toml"
      - uses: superfly/flyctl-actions@1.3
        if: ${{ github.ref_name == 'master' }}
        with:
          args: "deploy -c fly/fly.web.production.toml"
Limitations
While Fly’s postgres implementation offers a lot of ops convenience out of the box (for example High Availability, easy upgrades), it’s not a fully managed solution like Heroku’s offering. Most painfully, it misses an automated backup and restore solution.
In what seemed a bit of a peculiar move, Fly’s CEO recommended CrunchyData as a cloud-native managed solution, which, at least in my understanding, defeats the advantage of having a database close to your app server by adding inter-cloud-provider latency 🤷 (addendum: even though it doesn’t seem to add that much). Even more so, as Fly was always very proud and vocal about running everything on their own hardware, but Kurt Mackey has also made it clear that Fly won’t ship postgres-specific infrastructure, and they’d rather hand off that responsibility to a third party like Supabase (by the way, let’s hope PlanetScale gets a Postgres version soon!)
To close this section on a positive note, in response to the CrunchyData recommendation, SavvyCal founder Derrick Reimer found it sufficient for his purposes, and that’s certainly quite the testimonial.
Conclusion and Follow-Up
Especially when compared with Heroku, we still had to do a lot of manual tinkering, which might seem disappointing from the distance. I see the combination of a powerful CLI with expressive configuration files as a plus, because it surfaces critical infrastructure information instead of hiding them behind a PaaS dashboard or not-easily-memorizable CLI calls. Also, having come a long way in terms of (Dev)Ops, this setup for me seems to be the sweet spot between all-too-obfuscated infrastructure abstractions that leak as soon as something out of the ordinary occurs, and completely bespoke Kubernetes deployments. But please take that last sentence with a grain of salt - your mileage may greatly vary!
What’s more, the fly CLI as well as the web app have vastly improved their functionality and UX over the last couple of months, so I’m excited where this journey takes us. Who knows, the “one click installer” of the setup concocted in this article might be just a few PRs away! Maybe it’s also just a matter of someone providing the appropriate RailsByte.
Closing this article, I’d like to make two final observations:
- Depending on your app’s requirements, it might be worth noting that multi-region postgres is a first class citizen on Fly - meaning that you can have up to date read replicas close to your app servers. Bear in mind though that writes over long-lived connections (i.e. websockets) are not recommended to work with this paradigm - in other words, package up your destructive actions in POST requests/regular form submits.
- In May 2022, litestream was announced to join Fly. In case you haven’t heard of it, here’s the elevator pitch: SQLite instances replicated via S3 (or compatible object storage) and synchronized directly to your app server (soon). From the linked article:
SQLite isn’t just on the same machine as your application, but actually built into your application process. When you put your data right next to your application, you can see per-query latency drop to 10-20 microseconds.
Wow! The future looks amazing.
